css中如何實現鼠標經過出現氣泡框效果-創新互聯
這篇文章主要為大家展示了“css中如何實現鼠標經過出現氣泡框效果”,內容簡而易懂,條理清晰,希望能夠幫助大家解決疑惑,下面讓小編帶領大家一起研究并學習一下“css中如何實現鼠標經過出現氣泡框效果”這篇文章吧。

1. html
<!DOCTYPE html PUBLIC "-//W3C//DTD XHTML 1.0 Transitional//EN" "http://www.w3.org/TR/xhtml1/DTD/xhtml1-transitional.dtd">
<html xmlns="http://www.w3.org/1999/xhtml">
<head>
<meta http-equiv="Content-Type" content="text/html; charset=UTF-8" />
<title>Animated Menu Hover 1</title>

<script type="text/javascript" src="http://www.webdesignerwall.com/demo/jquery/jquery.js"></script>

<script type="text/javascript">
$(document).ready(function(){
 $(".menu li").hover(function() {
  $(this).find("em").animate({opacity: "show", top: "-75"}, "slow");
 }, function() {
  $(this).find("em").animate({opacity: "hide", top: "-85"}, "fast");
 });
});
</script>

<style type="text/css">
body {
 margin: 10px auto;
 width: 570px;
 font: 75%/120% Arial, Helvetica, sans-serif;
}
.menu {
 margin: 100px 0 0;
 padding: 0;
 list-style: none;
}
.menu li {
 padding: 0;
 margin: 0 2px;
 float: left;
 position: relative;
 text-align: center;
}
.menu a {
 padding: 14px 10px;
 display: block;
 color: #000000;
 width: 144px;
 text-decoration: none;
 font-weight: bold;
 background: url('//img.jbzj.com/file_images/article/201703/button.gif') no-repeat center center;
}
.menu li em {
 background: url('//img.jbzj.com/file_images/article/201703/hover.jpg') no-repeat;
 width: 180px;
 height: 45px;
 position: absolute;
 top: -85px;
 left: -15px;
 text-align: center;
 padding: 20px 12px 10px;
 font-style: normal;
 z-index: 2;
 display: none;
}
</style>
</head>

<body>

<ul class="menu">
 <li>
  <a href=https://www.jb51.net rel="external nofollow" >Web Designer Wall</a>
  <em>A wall of design ideas, web trends, and tutorials</em>
 </li>
 <li>
  <a href="http://www.jb51.net" rel="external nofollow" >Best Web Gallery</a>

  <em>Featuring the best CSS and Flash web sites</em>
 </li>
 <li>
  <a href="http://www.jb51.net" rel="external nofollow" >N.Design Studio</a>
  <em>Blog and design portfolio of WDW designer, Nick La</em>
 </li>
</ul>

</body>
</html>
2. js
<script type="text/javascript">
$(document).ready(function(){
$(".menu li").hover(function() {
$(this).find("em").animate({opacity: "show", top: "-75"}, "slow");
}, function() {
$(this).find("em").animate({opacity: "hide", top: "-85"}, "fast");
});
});
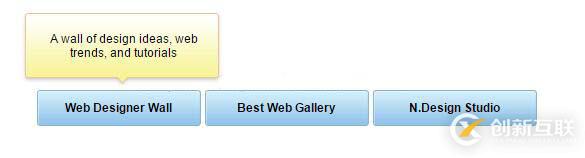
</script>3. 效果圖
以上是“css中如何實現鼠標經過出現氣泡框效果”這篇文章的所有內容,感謝各位的閱讀!相信大家都有了一定的了解,希望分享的內容對大家有所幫助,如果還想學習更多知識,歡迎關注創新互聯網站建設公司行業資訊頻道!
另外有需要云服務器可以了解下創新互聯建站www.yijiale78.com,海內外云服務器15元起步,三天無理由+7*72小時售后在線,公司持有idc許可證,提供“云服務器、裸金屬服務器、高防服務器、香港服務器、美國服務器、虛擬主機、免備案服務器”等云主機租用服務以及企業上云的綜合解決方案,具有“安全穩定、簡單易用、服務可用性高、性價比高”等特點與優勢,專為企業上云打造定制,能夠滿足用戶豐富、多元化的應用場景需求。
本文標題:css中如何實現鼠標經過出現氣泡框效果-創新互聯
網站URL:http://www.yijiale78.com/article16/djgddg.html
成都網站建設公司_創新互聯,為您提供電子商務、App開發、Google、定制開發、靜態網站、品牌網站制作
聲明:本網站發布的內容(圖片、視頻和文字)以用戶投稿、用戶轉載內容為主,如果涉及侵權請盡快告知,我們將會在第一時間刪除。文章觀點不代表本網站立場,如需處理請聯系客服。電話:028-86922220;郵箱:631063699@qq.com。內容未經允許不得轉載,或轉載時需注明來源: 創新互聯

- 營銷型網站建設這樣做好規劃! 2021-09-05
- 企業營銷型網站建設的幾大要素是什么? 2015-07-28
- 營銷型網站建設這幾方面務必要注意 2021-09-20
- 成都營銷型網站建設有什么特點 2016-03-29
- 營銷型網站建設與博客之間那些你不知道的事兒 2022-12-29
- 營銷型網站建設五大注意事項? 2022-11-05
- 營銷型網站建設常見的幾個問題 2016-08-14
- 北京豐臺營銷型網站建設三要素 2020-12-06
- 營銷型網站建設應該從哪幾點著手 2013-06-19
- 模板網站建設與個性化定制營銷型網站建設有哪些區別? 2022-10-17
- 營銷型網站建設應該如何做好策劃 2023-02-13
- 佛山營銷型網站建設哪家建站公司好 2022-08-07