nginx服務器的搭建和配置方法-創新互聯
這篇文章主要介紹“nginx服務器的搭建和配置方法”,在日常操作中,相信很多人在nginx服務器的搭建和配置方法問題上存在疑惑,小編查閱了各式資料,整理出簡單好用的操作方法,希望對大家解答”nginx服務器的搭建和配置方法”的疑惑有所幫助!接下來,請跟著小編一起來學習吧!

一、安裝編譯工具及庫文件
依賴庫安裝,一定要按照順序安裝:
(1) 如果沒有安裝c++編譯環境
yum install gcc-c++
(2) ssl 功能需要 openssl 庫
wget https://www.openssl.org/source/openssl-1.1.0f.tar.gz
tar -zxvf openssl-1.1.0f.tar.gz
cd openssl-1.1.0f
./config make && make install
(3) rewrite 模塊需要 pcre 庫
wget https://ftp.pcre.org/pub/pcre/pcre-8.01.tar.gz
tar -zxvf pcre-8.01.tar.gz
cd pcre-8.01
./configure make && make install
(4) gzip 模塊需要 zlib 庫
wget https://nchc.dl.sourceforge.net/project/libpng/zlib/1.2.11/zlib-1.2.11.tar.gz
tar -zxvf zlib-1.2.11.tar.gz
cd zlib-1.2.11
./configure make && make install
(4) nginx安裝
wget http://nginx.org/download/nginx-1.12.1.tar.gz
tar -zxvf nginx-1.12.1.tar.gz
cd nginx-1.12.1
./configure --prefix=/usr/local/nginx make && make install
二、設置依賴庫連接
如果輸入語句:./usr/local/nginx/sbin/nginx出現錯誤:
error while loading shared libraries: libpcre.so.0: cannot open shared object file: No such file or directory
可輸入:
whereis libpcre.so.1
結果:libpcre.so: /lib64/libpcre.so.1 /usr/local/lib/libpcre.so /usr/local/lib/libpcre.so.0
再使用ln命令,將libpcre.so.0,libpcre.so和libpcre.so.1連接到lib64目錄下:
ln -s /usr/local/lib/libpcre.so.0 /lib64
三、Nginx 配置
創建 Nginx 運行使用的用戶 www:
/usr/sbin/groupadd www
/usr/sbin/useradd -g www www
配置ngix.conf, 輸入:vi /usr/local/webserver/nginx/conf/nginx.conf的內容修改為:
user www www;
worker_processes 2;

error_log ../error.log;
pid    /usr/local/nginx/nginx.pid;

worker_rlimit_nofile 65535;
events
{
  use epoll;
  worker_connections 65535;
}


http
{
  include    mime.types;
  default_type application/octet-stream;

  log_format main '$remote_addr - $remote_user [$time_local] "$request" '
           '$status $body_bytes_sent "$http_referer" '
           '"$http_user_agent" "$http_x_forwarded_for"';

 server_names_hash_bucket_size 128;
 client_header_buffer_size 32k;
 large_client_header_buffers 4 32k;
 client_max_body_size 8m;

 sendfile on;
 tcp_nopush on;
 keepalive_timeout 60;
 tcp_nodelay on;
 fastcgi_connect_timeout 300;
 fastcgi_send_timeout 300;
 fastcgi_read_timeout 300;
 fastcgi_buffer_size 64k;
 fastcgi_buffers 4 64k;
 fastcgi_busy_buffers_size 128k;
 fastcgi_temp_file_write_size 128k;
 gzip on;
 gzip_min_length 1k;
 gzip_buffers 4 16k;
 gzip_http_version 1.0;
 gzip_comp_level 2;
 gzip_types text/plain application/x-javascript text/css application/xml;
 gzip_vary on;
 server
 {
    listen    80;//端口
    server_name localhost;//域名
    index test.html index.htm index.php;//解析網頁名稱
    root /usr/local/nginx/html; #站點目錄
  location ~ .*\.(php|php5)?$
  {
   #fastcgi_pass unix:/tmp/php-cgi.sock;
   fastcgi_pass 127.0.0.1:9000;
   fastcgi_index index.php;
   include fastcgi.conf;
  }

  location ~ .*\.(gif|jpg|jpeg|png|bmp|swf|ico)$
  {
   expires 30d;
 # access_log off;
  }
  location ~ .*\.(js|css)?$
  {
   expires 15d;
  # access_log off;
  }
  access_log off;
 }

}
檢查配置是否正確:
/usr/local/webserver/nginx/sbin/nginx -t
啟動:/usr/local/webserver/nginx/sbin/nginx
監聽進程:ps -ef|grep nginx
訪問服務器IP: 192.168.1.23

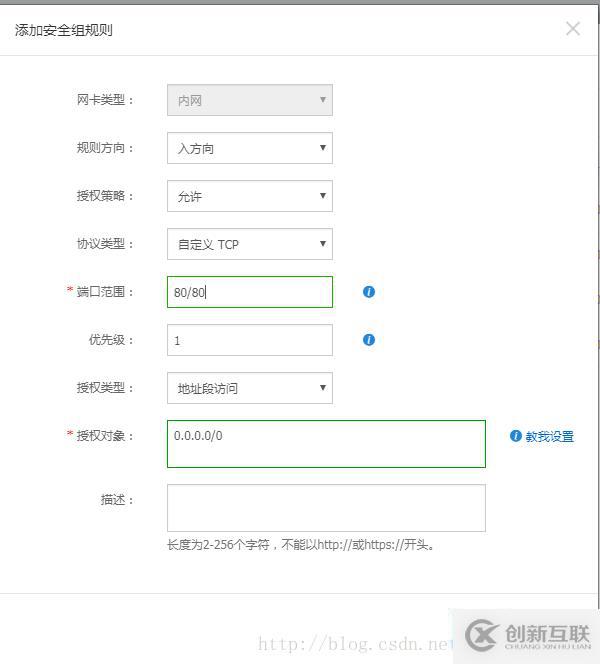
問題:配置正確時,也會出現IP地址無法訪問的情況:
可以通過阿里云服務器,esc服務器->安全組->配置規則->添加規則,進行配置即可。

到此,關于“nginx服務器的搭建和配置方法”的學習就結束了,希望能夠解決大家的疑惑。理論與實踐的搭配能更好的幫助大家學習,快去試試吧!若想繼續學習更多相關知識,請繼續關注創新互聯網站,小編會繼續努力為大家帶來更多實用的文章!
文章標題:nginx服務器的搭建和配置方法-創新互聯
文章路徑:http://www.yijiale78.com/article28/psdjp.html
成都網站建設公司_創新互聯,為您提供定制網站、外貿網站建設、網站建設、企業建站、微信公眾號、移動網站建設
聲明:本網站發布的內容(圖片、視頻和文字)以用戶投稿、用戶轉載內容為主,如果涉及侵權請盡快告知,我們將會在第一時間刪除。文章觀點不代表本網站立場,如需處理請聯系客服。電話:028-86922220;郵箱:631063699@qq.com。內容未經允許不得轉載,或轉載時需注明來源: 創新互聯

- 大理網站建設-電子商務網站主頁UI設計有什么重要性? 2021-08-24
- 電子商務網站如何做到出奇制勝 2015-08-04
- B2C電子商務網站建設怎么做 2022-08-03
- 電子商務移動時代,移動通用實名引領創新 2023-01-04
- 佛山網站建設-電子商務網站網頁美感分析 2021-11-27
- 開發一個電子商務平臺需要多少錢 2021-10-12
- 網站報價差別為何這么大?建個網站一般要多少錢? 2022-06-07
- 一個電子商務網站設計指南 2016-08-20
- 普陀電子商務網站建設如何開發提高競爭力 2020-11-23
- 探索SEO與電子商務之間的關系 2022-07-22
- 關于大力推進電子商務發展的冷思考 2020-02-12
- 電子商務網站該怎么做 2016-02-12